FRIDAY, DECEMBER 19, 2014
Have you ever been swamped with photos to edit? like a wedding gallery or the Christmas season with all the minis and sales going on? And to top it off, you have to edit each one? Don't get me wrong editing is SO much fun, I love doing it! but you and I know it can be a hassle sometimes, and a lot of times your clients get them a little later than they expected.
Well, I have a little solution to this problem! And it is using 1 tool in Lightroom... yes I said ONE tool, and it's called the "Tone Curve"
I use the tone curve tool quite often. (all the time actually) Little did I know this hidden secret when I first began using it!
And you can learn this secret. It is super easy, brings out the gold in sunsets and makes a crisp photograph! It truly is a life saver most of the time. :)
 |
| This photo was taken at 4:00pm EST just when the sun was about to leave me. See in the before it's not so strong on me and it is hardly highlighting my backdrop or body line.. Now take a look at the after. It totally killed it! The backdrop is enhanced to its crisp golden gloriousness! The haze is also gone because of the contrast it gives. This tool is a miracle! ;) Here are a few more before/after photos. |
 |
Urr the light was not so yummy when I shot this... I hate when the sun is gone and all a photo looks like is blue hues..
Now the after, All I did was use the tool and added luminance for some softness. Woala! |
 |
This one was just in the shade with the sun behind me.
I wanted a certain 'look' to this one. I wanted the warm and bright backdrop but also light in my face,
But the shade gives you the blue hues.. bleh.. annd now the after, again used the toll added a few notches of warmth and some luminance. |
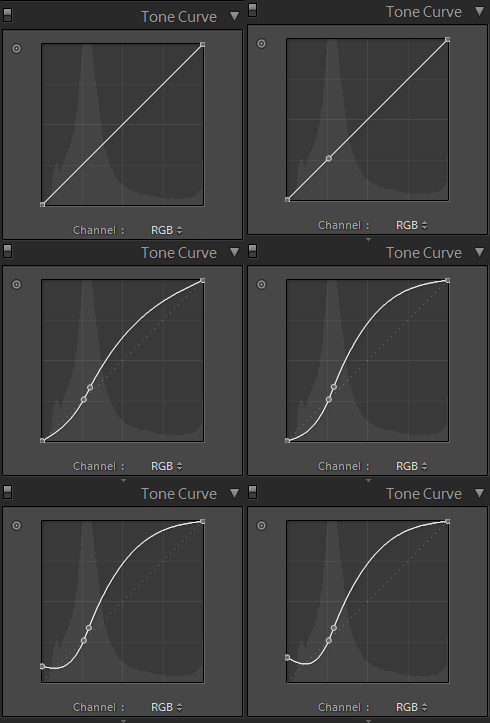
Take a look at this small diagram and just copy what it shows. You can create a preset with added temperature and luminance for a warm and soft photo.
I really hope that this is a helpful tutorial for our fellow Lightroom users!
Have a great night!
~Rose


No comments:
Post a Comment